Sensor Size and Equivalence
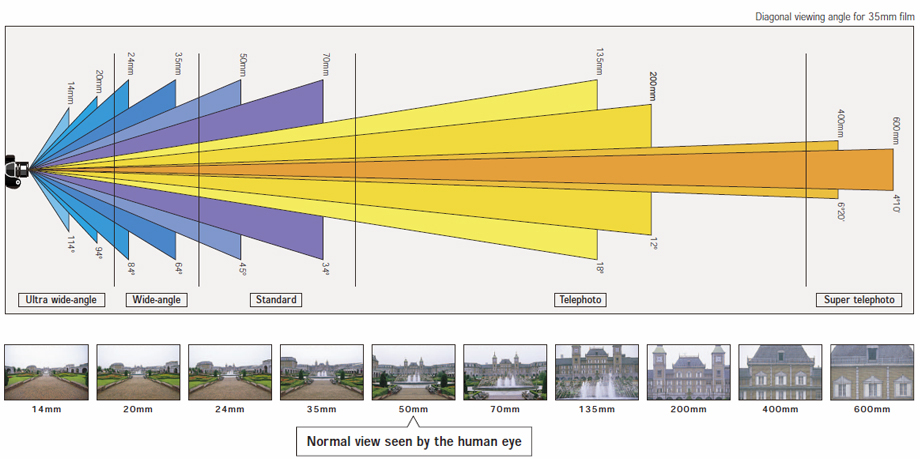
We’ve already discussed how the focal length of a lens affects field of view. A 24mm lens will see a wider angle of view than a 70mm lens. However, there is another factor that affects angle of view – the size of the sensor inside of the camera being used.
The focal length of a lens is the distance between the focal plane within the lens (basically, the point at which the light is gathered) and the sensor of the camera. That’s an absolute measurement that dramatically influences angle of view – when the focal plane is near the sensor, the area seen is wider. To visualize how this works, imagine holding a cardboard tube in front of your eye. When the tube is near your eye, you can see a wide area through the tube. When you hold the tube at arm’s length and look through it, you can only see a narrow area through the tube. This is similar to the way a lens’ focal length determines its angle of view.
After the light enters through a camera’s lens, it hits the camera’s sensor. If that sensor is large, a wider image is captured; if the sensor is smaller, a smaller image is captured. To visualize this, imagine a projector shining an image onto a screen; the image is the light coming through the lens and the screen is the sensor of the camera. If you were to replace the screen with a smaller one (without changing its position), some of the original image would be cut off and you would see a narrower angle of view.
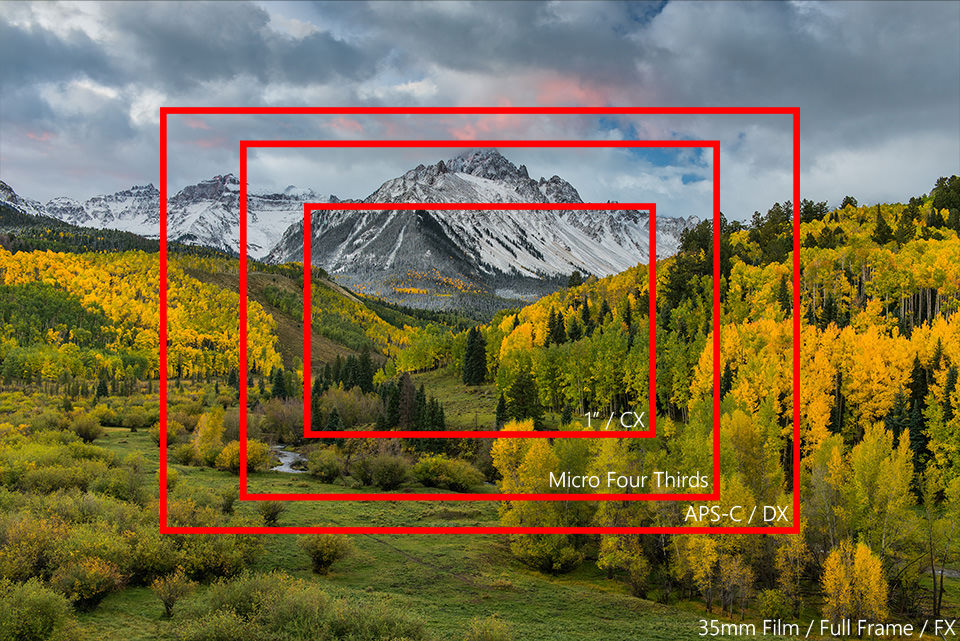
This means that the angle of view in a frame of video is determined by both focal length and sensor size. A 24mm lens has a wide angle of view on a camera with a large sensor, but will look zoomed in on a camera with a small sensor, since some of the image is cropped out. In order to make sense of these variables, we often talk about lens equivalence.
Equivalence uses a universal standard to describe the angle of view a lens produces. Since film was the default format for stills photography for so long, most photographers think in those terms – we refer to camera sensors the same size as standard film (also known as 35mm film, which is the size of the film, not the focal length) “full frame.” On a full frame camera, lenses with a focal length up to around 35mm are considered wide angle; around 50mm is considered mid-range; and 70mm and up is considered zoom or telephoto.
When we talk about lens equivalence, what we are actually doing is figuring out what focal length we would need to use to get the same angle of view on a full frame camera. For example, on a micro four thirds sensor camera, 50% of the image is cropped out compared to a full frame camera. That means that a 25mm lens is a 50mm full frame equivalent. To put it another way, a 25mm lens on micro four thirds captures the same angle of view as a 50mm lens on full frame.
Because we are determining how much of the angle of view is cropped out, this is also referred to as a camera’s “crop factor.” Micro four thirds cameras have a crop factor of 2 – you must multiply the focal length of a lens by 2 to get the full frame equivalent. APS-C is a popular sensor size in Canon, Nikon, and Sony cameras – they have a crop factor of about 1.6. Cameras like our Sony RX10 ii have a 1 inch sensor and a crop factor of 2.7; our BlackMagic Pocket Cinema Camera has a crop factor of 2.9, with its Super 16-sized sensor.
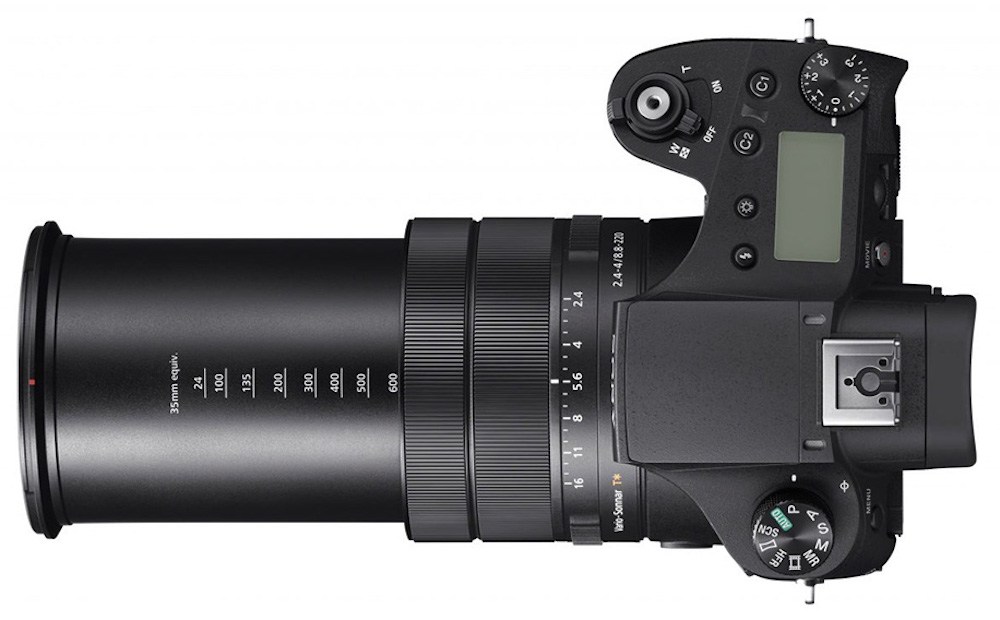
Most lenses are labeled with their actual focal length – not their equivalent one. This means that you need to take a camera’s crop factor into account when choosing a lens. Our Nikon prime lenses can be mounted on our BlackMagic Pocket Camera, our Panasonic Gh3 and GH4 cameras, and our Sony FS5 – all of which have different sensor sizes and different crop factors. A 28mm lens will look wide on the Sony and telephoto on the BlackMagic. Cameras with a fixed lens (like our Sony RX10 ii) tend to list the equivalent focal length instead of the actual focal length, which saves you the trouble of doing the math.
Of course, all of this confusion could be avoided if we just talked about angle of view instead of focal length. Focal length has been the standard for a long time, though, and it doesn’t seem to be going away any time soon.
The Exposure Triangle
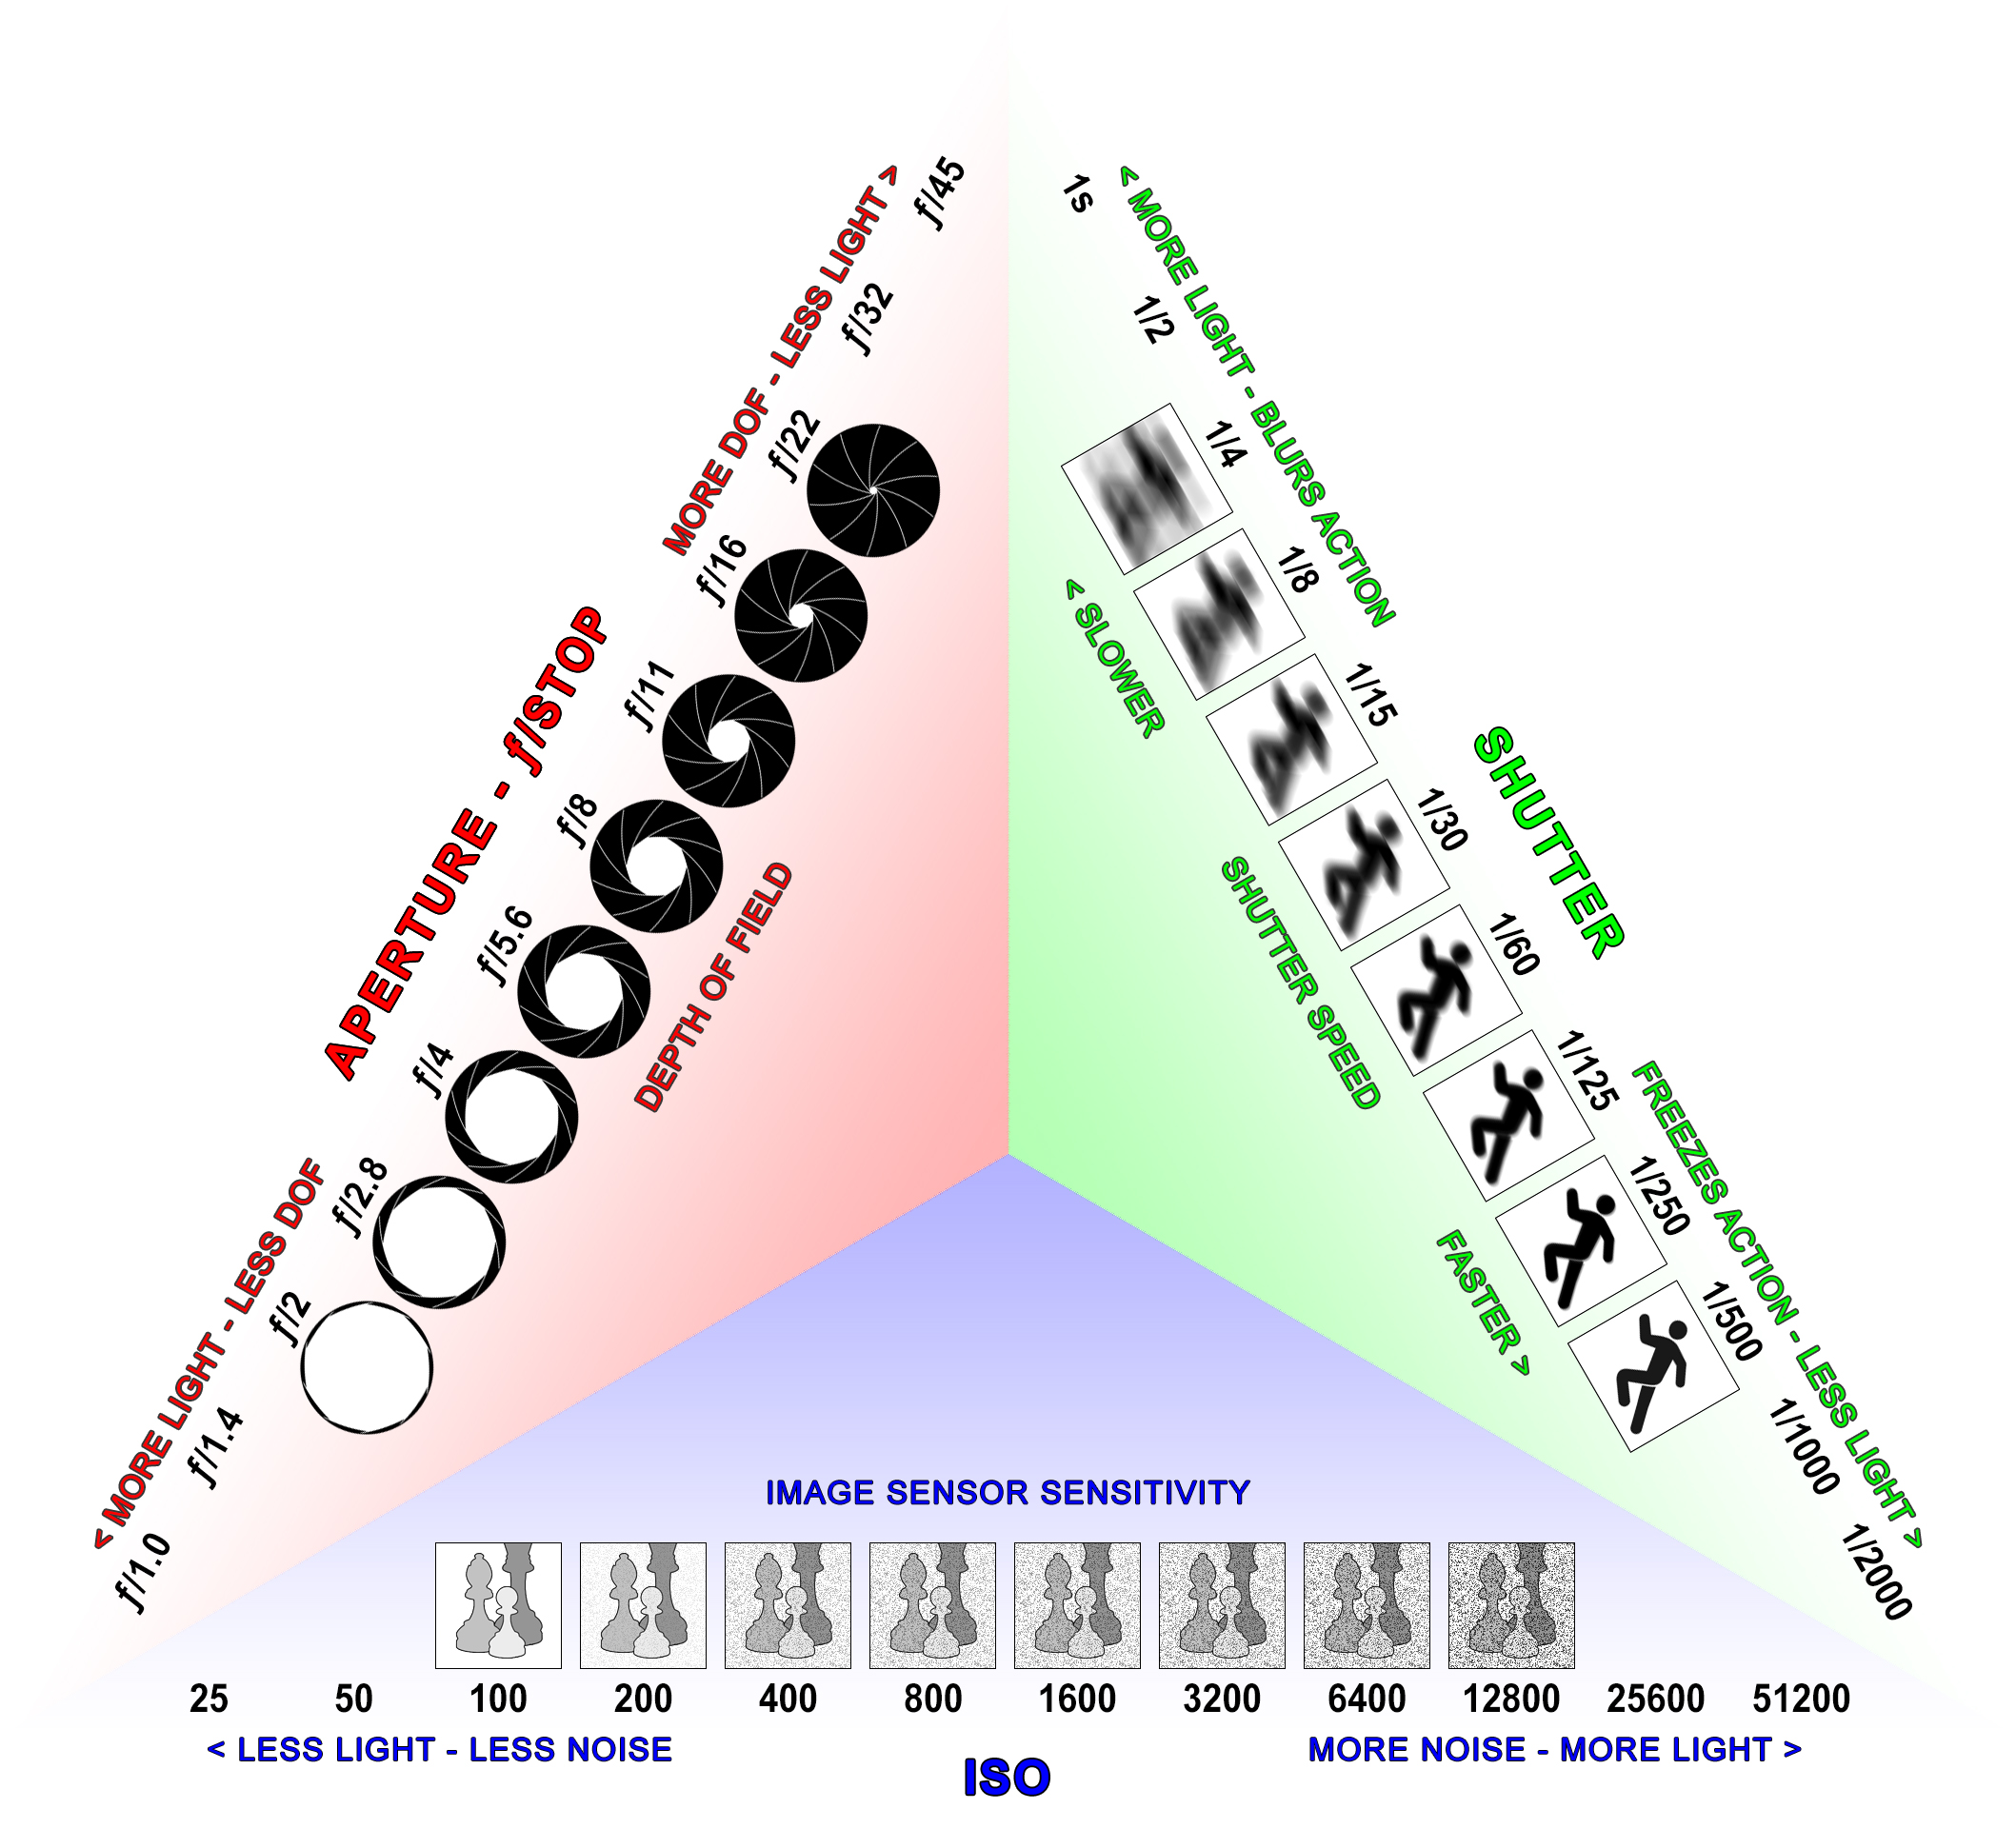
Let’s switch gears now and talk about actually capturing images with a camera. There are three primary settings that we use to control the image captured by a camera: aperture, shutter speed, and ISO. Of course, there are other factors to consider when setting exposure; for example, you might simply add more lights to a scene, move from the sunlight to the shade, or use an ND filter in front of the lens. However, aperture, shutter speed, and ISO are the three settings that you will always make to the camera and lens, so they are especially important. These three settings are often referred to as the exposure triangle.
Each side of the exposure triangle has costs and benefits. Opening the aperture lets in more light and makes the image brighter, but it also makes the depth of field shallower. Using a longer shutter speed lets in more light, but it also adds motion blur. Using a higher ISO makes the sensor more light-sensitive, but it also degrades the overall image quality by adding grain and noise. The inverse of all these is also true: a smaller aperture creates a darker image with a deeper depth of field; a shorter shutter speed creates a darker image with less motion blur; and a lower ISO creates a darker image with less noise. Understanding these tradeoffs is a really important part of knowing how to use a camera effectively.
Here are some basic guidelines for using the exposure triangle: Start by setting your shutter speed to twice the frame rate, using the 180 degree rule. So, if you shutter speed is 24 frames per second, set it to around 1/48 of a second. There is definitely some wiggle room here, but doubling the frame rate will give you a natural looking amount of motion blur: not too blurry and not too jittery. Your aperture should be set according to the kind of shot you are trying to capture. If you want a dramatic, shallow depth of field, use a wide aperture (low number) and if you want to see both the background and foreground clearly, use a small aperture (high number). You can then set your overall brightness level by controlling the ISO: a high ISO to make things brighter and a low ISO to make things darker. However, you should also take care not to raise the ISO too high, since the quality of the image will degrade. For most of the cameras we’ll be using, I’d recommend keeping it under ISO 1000 and lower if you can. If your image is still too dark, you probably want to consider the external factors, such as the lights you are using and the environment you are filming in.
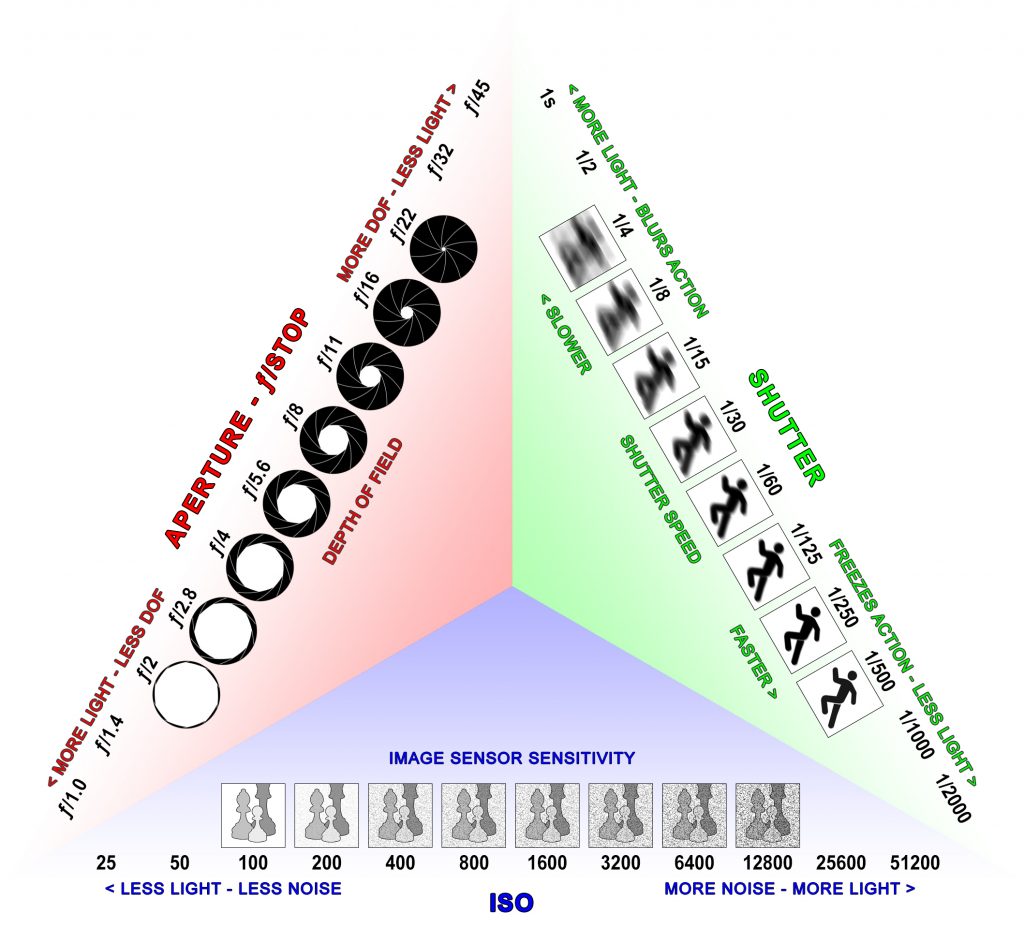
As you (hopefully) recall from our lesson on camera vocabulary, an f-stop represents a doubling or halving of the amount of light being captured. The cool thing about the exposure triangle is that you can use the different settings to compensate for each other. If you change your aperture from f/2.8 to f/4, that means you lose one f-stop of light. You can then raise your ISO from 400 to 800, gaining one f-stop of light and retaining your overall brightness level. This may seem a little confusing at first, but it can quickly become second nature and it’s extremely useful when filming.
Need a quick refresher on the basics of exposure? Check out these fun videos on aperture, ISO, and shutter speed.
